Showing posts with label Photoshop Tutorial. Show all posts
0
Original image by Rubén Colorado
Give Your Photos a Retro Comic Book Effect - How about a fun effect for your incredibly boring photo albums? Creating a old comic book effect for your photos is easy and the results are visually appealing. More fun is achieved when adding captions to your photos using comic book fonts and design elements.
This tutorial will show you how to give a comic book look to your photos using a couple of filters and some additional decorations. 

Old halftone print effect

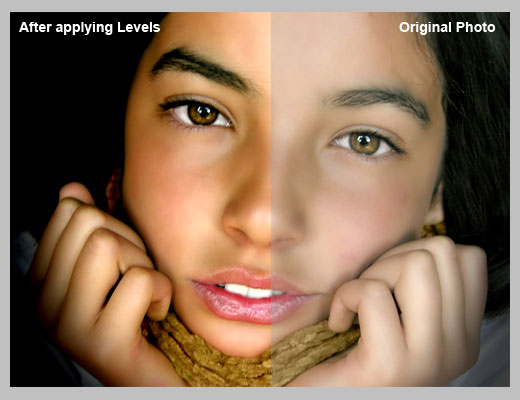
Download and open this photo in Photoshop. Now we are going to increase the overall contrast of the picture by burning it a bit. Go to IMAGE > ADJUSTMENTS > LEVELS…With this image we are going to set the INPUT LEVELS to 60 / 1.00 / 220. But this is only for this example. Choose the best settings for each photo.
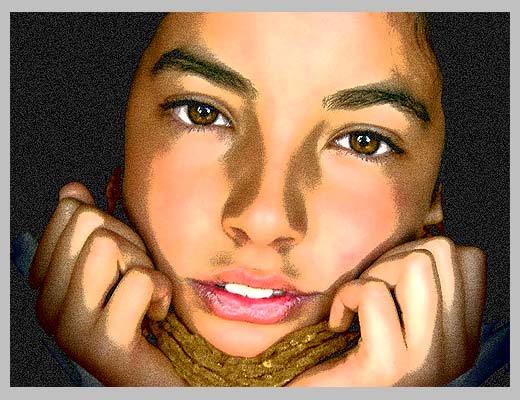
In this step we are going to give the photo an illustrated look with some graininess to give the illusion of an old and bad quality paper. It is not a realistic effect, it is just some distortion to the image to help us achieve the final look. Go to FILTERS > ARTISTIC > FILM GRAIN. In this case we are going to use: GRAIN: 4, HIGHLIGHT AREA: 0, INTENSITY: 10. Try different settings for different photos.
Duplicate the layer and name the new layer HALFTONE
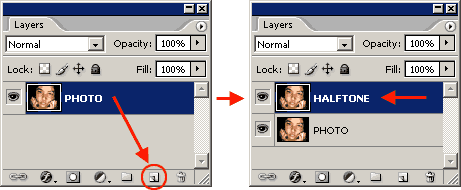
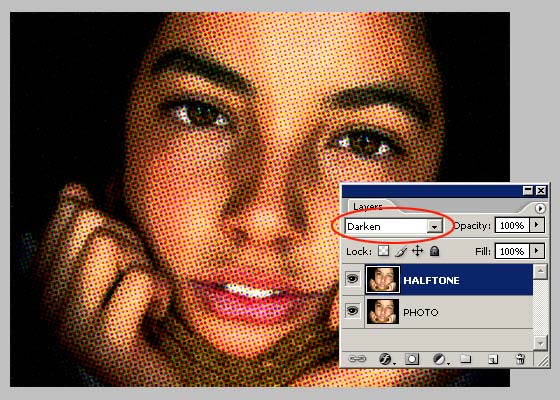
In this step we are going apply a halftone pattern to the image to give the final old comic book printing effect. Go to FILTER > PIXELATE > COLOR HALFTONE. Set MAX RADIUS: 4 and leave the rest with the default values. Press OK and then go to the LAYERS PALETTE and set the BLENDING MODE to DARKEN.
Adding comic book elements to the picture

The effect looks nice so far. It is not a realistic old comic book effect, it simple resembles that look. To make it more real, now comes the fun part. We are going to add some unique elements that are very popular on comic books and strips
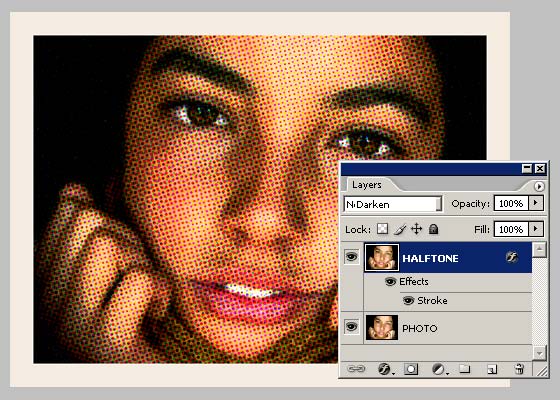
Select the HALFTONE layer and set a STROKE LAYER STYLE of WIDTH: 20px, POSITION: Inside and COLOR: #F5ECE1.
Add a new layer and draw a small rectangle at the top left of the frame of the image. Give it a STROKE of 3 pixels and paint it orange. An orange to yellow gradient looks better. Draw another rectangle, a bit larger this time, on the lower left corner of the frame. Give it a STROKE of 3 pixels and paint it white. The final result should be like the one below:
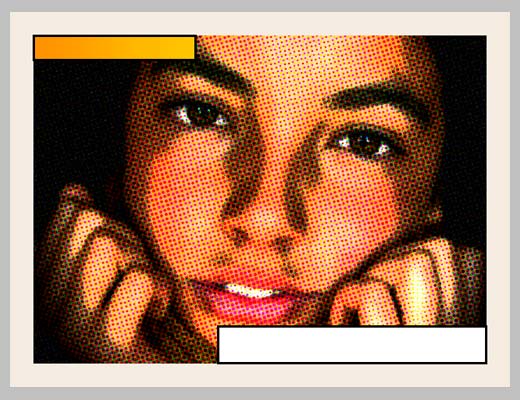
Lets add a border to the image: Add a new empty layer above the layer containing the rectangles we created in the previous step. Select the RECTANGLE SELECTION TOOL from the TOOLS PALETTE. Draw a selection from the top left (right inside the frame) to the bottom right border of the image.
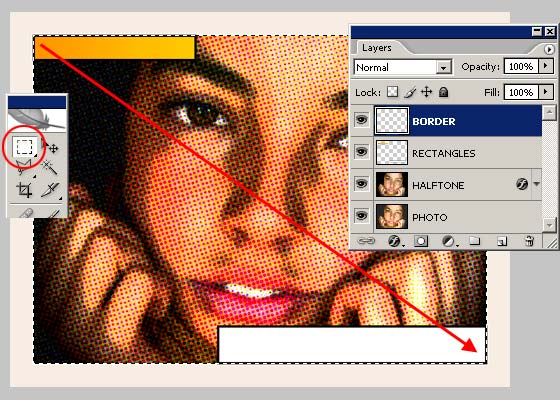
Go to EDIT > STROKE, set WIDTH: 4px, COLOR: BLACK, LOCATION CENTER and press OK.
DESELECT the current selection and go to FILTER > BLUR > BLUR MORE. Then apply a small distortion using FILTER > DISTORT > RIPPLE… (Amount 20%, Size Medium). Now, lets sharpen the stroke a bit with FILTER > SHARPEN MORE and there you have a nice simulated hand drawn border.
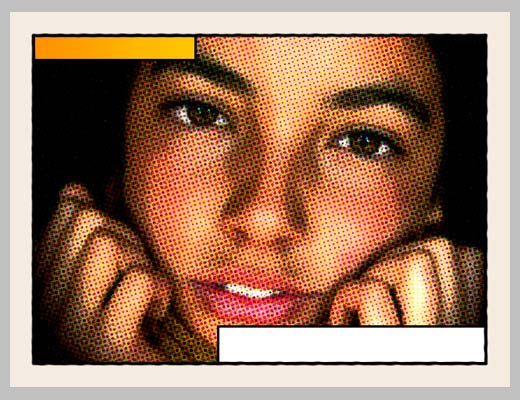
Adding captions using a Free comic book font

To add captions to the photo you can use any font you like, but only using fonts specially designed for comic books you will be able to achieve the desired look. Download the free font Digital Strip and install it. At the end of this article you will find a lot of free and commercial comic book fonts and resources.
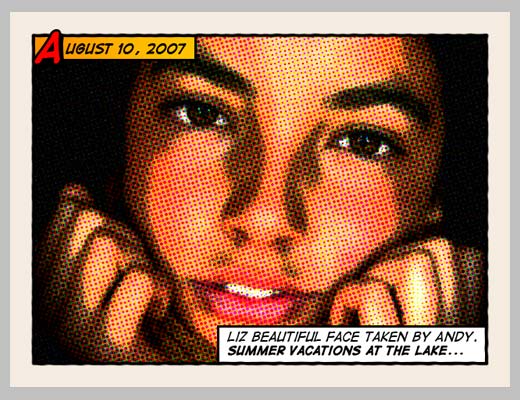
Using the Digital Strip font you’ve just downloaded, type a date on the top orange rectangle. Play with the first letter of the text by adding a stroke, a shadow and a bright contrasting color.
Then write a caption for the photo at the bottom white rectangle. Highlighting some words in bold also looks good.
And that’s all. Your image should look similar to the one below:
Click on the image to see a larger and uncompressed version.
source tutorial and image host
0
Simple Cartoon/Comic Style With Photoshop- This is a very easy-to-achieve effect that I used in a small project recently. If your photo is a little bit comedic, or that's the theme you're going for, then adding a cartoon/comic-style effect might be a good idea.
Readmore Simple Cartoon/Comic Style
0
How to Apply Toon Style Coloring Techniques to a Pencil Drawing - It’s hard to go past the benefits of vector illustration for use in printing. Editable scale, color and composition put vector ahead of traditional illustration but it can’t compare to the style of hand drawn images. In this tutorial we will learn how to easily take a pen and pencil sketch and turn it into a vector illustration without losing the aesthetic of a hand rendered image.
Drawing materials and tools you need:
  • Thick drawing paper with smooth matt surface
  • Pencils – B & 2B
  • Fine-liner pens with 0.1 – 0.2 mm line width
  • Eraser, preferably kneadable style
  • Scanner
Readmore How to Apply Toon Style Coloring Techniques to a Pencil Drawing
0


No matter how you start it, either from raw sketch or a photo, creating a cartoon or comic illustration is always fun. Here are a short list compilation of various techniques to create it.


0

Looking to Make a Cartoon Out of Your Photo?

With the advent of graphic and photo design software such as Adobe's Photoshop, it has become increasingly easier to create realistic looking (ie. more "hand-drawn") cartoons and animations. We're going to show you a couple techniques you can use to convert any photo into a cartoonized version. In other words, how to turn a photo into a cartoon.

How to Cartoonize a Photo

This tutorial is specific to Photoshop, but if you look closely at what you're doing, you'll find similar functionality in other photo retouching software such as Corel's Paint Shop Pro (which is a lot more affordable than Photoshop), and the open source alternative GIMP (for Linux, but there is also a Windows version available).]

Cartoonizing a Photo in Photoshop


We're going to go over two different methods you can use to cartoonize a photo using Photoshop. These particular examples utilize Photoshop CS 2, but earlier and later versions should have similar functionality. The first method is very simple, but doesn't quite produce as accurate a cartoon effect as the more involved step-by-step method. Either way, you can decide for yourself. Try the easy version first and see what you think - it works better on some photos than others. Then go for the more in-depth tutorial and see if it makes a difference. We also show you how to create a macro (batch action) that will automatically cartoonize a photo by carrying out all your commands at once.
0
Converting a rough sketch into a polished piece of digital art might not be as hard as you think. In today’s quick tip tutorial we will demonstrate how to import a sketch into Photoshop and color it! Let’s get started!

Step 1

The first step is to sketch out your idea. You can sketch your idea to paper or you can draw directly in Photoshop.
0

When it comes to creating cartoon characters, one of the first things people say is, “But I can’t draw!”. I can certainly relate to their frustration too, as I consider myself far from being ‘good at drawing’. I often end up getting annoyed and screw up my sketchbook pages when attempting to draw things, but there’s a few little tips I’ve learnt from studying the basics of sketching from a young age. One major tip that seriously helped me out was from my childhood hero Tony Hart. In his book ‘Draw it Yourself’, he described how to combine basic shapes to build up the form of a character. Can you draw a triangle? What about a semi-circle? Excellent, you’re on for a winner!
0
First, one must ask the obvious question: why? Why spend the time drawing the whole thing when there are super fast filters and plugins, etc. that do just as good a job? The answer is quite obvious, actually: control. By doing everything yourself you have complete control over every aspect of the design, from stroke width to color choices.
So, without further ado, let’s dive right in.

0
First of all, I highly recommend using Adobe Photoshop in which all the steps below are achieved. It’s an industry standard and will also come in handy for everything else creative you choose to do. I know it’s expensive but it’s worth every penny.

If you are new to coloring comics in Photoshop, here are the very first things you will want to learn. Later posts will get more advanced, so bare with me all you experts.
0


Drawing vector shape can be done both in Photoshop and Illustrator. But some of us with different preferences or technical reasons, start the vector pathing process in Illustrator and would probably give additional graphic effect in Photoshop later. I recently read a quick tutorial that explainshow to convert Illustrator vector shapes into Photoshop "Custom Shapes".

This tutorial is originally written by Thomas Maier. A graphic designer and web developer, communication and social media specialist who resides in Germany.

Visit the Tutorial
0

Mickel a developer & designer from Sweden has written a Photoshop special effects tutorial for PixelTango.

The effects are created from scratch with a bunch of filters.